Requirements and Recommendations before installing SCCM 2012 R2

In the first part of SCCM 2012 and SCCM 1511 blog series, we will cover SCCM installation prerequisites most specifically hardware requirements, design recommendations and server prerequisites.

Hardware Requirements

The hardware requirements for a Primary Site server largely depends on the features that are enabled, and how each of the components is utilized. When the number of clients grows and changes, the server hardware requirements change accordingly. For the initial deployment, hardware requirements can be estimated for each server by determining:

  • The overall need for each component (Will you do Operating System Deployment ? How many daily software deployments ? Is Inventory and reporting is important for your organisation ? Will you manage Internet Client ?)
  • The number of clients planned to be installed
  • The load on each of installed SCCM components

In general, medium environments (couple thousand clients) should consider the following recommendations when planning hardware:

  • SCCM and SQL Server communicate constantly. We recommend that the main database and SQL Server be installed on the Primary site server. This is fully debatable and we understand that some organisation try to standardize their SQL distribution. Performance are simply better using a local installation when configured properly
  • Neither the SCCM site nor the SQL database should share their disks with other applications
  • Configure the SQL Server databases and logs to run on a different disk than the disk where the SCCM database is located.

Another issue to consider when determining hardware requirements for a site servers is the total amount of data that will be stored in the database. To estimate the required database size for a single site, an approximate figure of 5Mb to 10Mb per client is typically used.

In our setup, we will install a single Primary Site that has the role of  Management Point, Reporting Point, Distribution Point, PXE Service Point, State Migration Point, Fallback Status Point and Software Update Point. SQL Reporting Services will be used to provide consolidated reporting for the hierarchy. This role will also be installed on the SCCM Server. Running reports can have an impact on server CPU and memory utilization, particularly if large poorly structured queries are executed as part of the report generation.

Consider placing client facing role (Distribution Point, Reporting Point) on separate server in order to reduce load on your Primary server.

Here’s our recommended reading about hardware requirements:

SCCM 1511

SCCM 2012

We strongly recommend that you understand SQL Server before installing SCCM. Talk and have a good relation with your DBA if you have one in your organisation.

Here’s our recommended reading  about SQL :

OS

For this post,  our servers runs Windows 2012 R2 with latest security patches

Disks

Disks IOs is the most important aspect of SCCM performance. We recommend to configure the disks following SQL Best practice. Split the load on different drive. When formatting SQL drives, the cluster size (block size) in NTFS must be 64KB instead of the default 4K. See the previous recommended reading to achieve this.

Primary Site server prerequisites

Once your hardware is carefully planned, we can now prepare our environment and server before SCCM Installation.

Active directory schema extension

You need to extend the Active Directory Schema only if you didn’t have a previous installation of SCCM in your domain. If you have SCCM 2007 already installed and planing a migration, skip this step.

  • Logon to a server with an account that is a member of Schema Admins security group
  • From SCCM ISO run .\SMSSETUP\BIN\X64\extadsch.exe

sccm 2012 r2 installation prerequisites

  • Check schema extension result, open Extadsch.log located in the root of the system drive

sccm 2012 r2 installation prerequisites

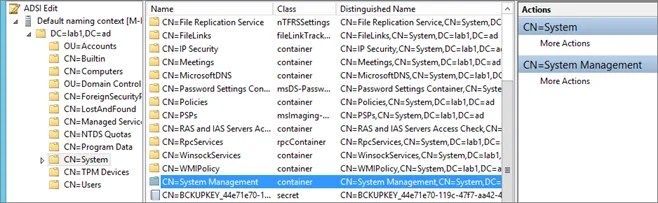
Create the System Management Container

Configuration Manager does not automatically create the System Management container in Active Directory Domain Services when the schema is extended. The container must be created one time for each domain that includes a Configuration Manager primary site server or secondary site server that publishes site information to Active Directory Domain Services

  • Start ADSIEdit, go to the System container and create a new Object

sccm 2012 r2 installation prerequisites

  • Select Container

sccm 2012 r2 installation prerequisites

  • Enter System Management

sccm 2012 r2 installation prerequisites

Set security permission

  • Open properties of the container System Management created previously

sccm 2012 r2 installation prerequisites

  • In the Security tab, add the site server computer account and Grant the Full Control permissions

sccm 2012 r2 installation prerequisites

  • Click Advanced, select the site server’s computer account, and then click Edit
  • In the Applies to list, select This object and all descendant objects
  • Click OK and close the ADSIEdit console

SCCM Accounts

Create the necessary accounts and group created before installation. You can use different name but i’ll refer to these names throughout the guide.

  • SQL server services account – SCCM-SQLService
  • SCCM Network Access Account – SCCM-NAA
  • Domain user account for use SCCM client push install  – SCCM-ClientPush
  • Domain user account for use with reporting services User – SCCM-SQLReporting
  • Domain account used to join machine to the domain during OSD – SCCM-DomainJoin
  • Domain group containing all SCCM Admins Group – SCCM-Admins
  • Domain group containing all SCCM servers in the hierarchy Group – SCCM-SiteServers

Network Configuration

  • Make sure that the server has a fix IP and that internet connection is up

Firewall Configuration

  • Make sure the firewall service is ON

Run this script in an elevated command prompt order to open the necessary ports needed for SCCM.

** If you are using custom ports, change the values before running the script. **

@echo ========= SQL Server Ports ===================
@echo Enabling SQLServer default instance port 1433
netsh advfirewall firewall add rule name="SQL Server" dir=in action=allow protocol=TCP localport=1433
@echo Enabling Dedicated Admin Connection port 1434
netsh advfirewall firewall add rule name="SQL Admin Connection" dir=in action=allow protocol=TCP localport=1434
@echo Enabling conventional SQL Server Service Broker port 4022
netsh advfirewall firewall add rule name="SQL Service Broker" dir=in action=allow protocol=TCP localport=4022
@echo Enabling Transact-SQL Debugger/RPC port 135
netsh advfirewall firewall add rule name="SQL Debugger/RPC" dir=in action=allow protocol=TCP localport=135
@echo ========= Analysis Services Ports ==============
@echo Enabling SSAS Default Instance port 2383
netsh advfirewall firewall add rule name="Analysis Services" dir=in action=allow protocol=TCP localport=2383
@echo Enabling SQL Server Browser Service port 2382
netsh advfirewall firewall add rule name="SQL Browser" dir=in action=allow protocol=TCP localport=2382
@echo ========= Misc Applications ==============
@echo Enabling HTTP port 80
netsh advfirewall firewall add rule name="HTTP" dir=in action=allow protocol=TCP localport=80
@echo Enabling SSL port 443
netsh advfirewall firewall add rule name="SSL" dir=in action=allow protocol=TCP localport=443
@echo Enabling port for SQL Server Browser Service's 'Browse' Button
netsh advfirewall firewall add rule name="SQL Browser" dir=in action=allow protocol=TCP localport=1434
@echo Allowing Ping command
netsh advfirewall firewall add rule name="ICMP Allow incoming V4 echo request" protocol=icmpv4:8,any dir=in action=allow

No_sms_on_drive.sms

Place a file name no_sms_on_drive.sms on the root drive of each drive you don’t want SCCM to put content on.

Windows Server Features

On the Primary site server, the following components must be installed before SCCM installation. We’ll install all these components using a PowerShell script.

  • .Net Framework 3.51 SP1
  • .Net Framework 4
  • IIS
  • Remote Differential Compression
  • BITS Server Extension
  • WSUS 3.0 SP2
  • Report Viewer
  • ADK for Windows 8.1

Roles and features

On the Site Sever computer, open a PowerShell command prompt as an administrator and type the following commands. This will install the required features without having to use the Windows 2012 GUI.

Get-Module servermanager
Install-WindowsFeature Web-Windows-Auth
Install-WindowsFeature Web-ISAPI-Ext
Install-WindowsFeature Web-Metabase
Install-WindowsFeature Web-WMI
Install-WindowsFeature BITS
Install-WindowsFeature RDC
Install-WindowsFeature NET-Framework-Features -source \\yournetwork\yourshare\sxs
Install-WindowsFeature Web-Asp-Net
Install-WindowsFeature Web-Asp-Net45
Install-WindowsFeature NET-HTTP-Activation
Install-WindowsFeature NET-Non-HTTP-Activ

Ensure that all component are showing as SUCCESS as an EXIT Code. It’s normal to have Windows Update warnings at this point.

sccm 2012 r2 installation prerequisites

Report Viewer

Download and install – here

ADK for Windows 8.1

Download and install – here

  • Select the default path

sccm 2012 r2 installation prerequisites

  • Do not join CEIP

sccm 2012 r2 installation prerequisites

  • Accept the License Agreement

sccm 2012 r2 installation prerequisites

  • Install the following components
    • Deployment Tools
    • Windows Pre-installation Environment
    • User state Migration tool

sccm 2012 r2 installation prerequisites

Active Directory

  • Add the computer account of all your site servers in the SCCM-SiteServers AD group
  • Ensure that the group has Full Control on the SYSTEM Container in Active Directory

Local Admin accounts

Add both SCCM computer account and the SCCM Admin account to the local administrator group on the site server.

  • SCCM-Admins
  • SCCM-SiteServers

SCCM 2007 Client

If applicable, uninstall SCCM 2007 client and FEP if present on the server before the installation. If the client is present, the 2012 SCCM Management Point installation will fail.

Windows Updates

Run windows update and patch your server to the highest level

Your server is now ready for the SQL installation.

Overview | SCCM 2012 R2 Step-by-Step Installation Guide

Next Part | How to install SQL 2012 before installing SCCM 2012 R2

Step-by-Step SCCM 2012 R2 Installation Guide

Performing a SCCM 2012 R2 installation is not a walk in the park. The product itself can be complex for inexperienced administrators. There’s already tons of SCCM 2012 R2 Installation Guide available, written by experienced blogger and MVPs but I think that very few gives the whole picture from the start to the last component. Our goal is to bring it a bit further, explaining concepts and best practice rather than just guide the user through the installation process.

We was hesitant to post this SCCM 2012 R2 Installation Guide because SCCM VNext is coming pretty fast (Release date could be announced at Microsoft Ignite) but I finally decided to release it anyway. We still get consulting contract to install SCCM 2012 R2 so it’s definitely still relevant information.

The SCCM 2012 R2 Installation Guide blog post series will describe everything about the installation process, from the server prerequisites to the various site role installation and configurations.

If you’re not familiar with SCCM 2012 R2 Features, you can visit this Technet article which covers it all.

If you’re familiar with the 2007 version and plans to migrate, read the Technet article about What’s New in SCCM 2012.

I hope this SCCM 2012 R2 Installation Guide brings all the information you need and that you’ll appreciate administering it..

SCCM 2012 R2 Installation Guide blog series

How to apply SCCM 1606 Update Rollup 1 (KB3186654)

The second hotfix for SCCM Current Branch (1606) is now available. This post is a complete SCCM 1606 Update Rollup 1 (KB3186654) installation guide. If you’re looking for a complete SCCM 1511 installation guide, see our blog series which covers it all. You can’t install this upgrade if you are running SCCM 2012. You need to be running at least SCCM 1606.

Installing SCCM upgrades is important for your infrastructure. It fixes a lot of issues from SCCM 1606, which some of them are important.

New Update and Servicing Model

If you’re not familiar with the new SCCM servicing model, read our New Update and Servicing section of the 1602 upgrade post which explain it all.

You may wonder what’s the difference between a Cumulative Update (CU) and an Update Rollup (UR) :

A CU is a new servicing baseline. A post-CU1 hotfix requires CU1 first, whereas a post-UR1 hotfix doesn’t require UR1. Like CU, UR are cumulative which means that UR2 will include previous hotfixes.

*If you are running SCCM 1511 or 1602, you first need to upgrade to 1606 prior to apply this Update Rollup, see our blog which covers the upgrade process. Once completed, the Update Rollup 1 will be available under Update and Servicing node.

SCCM 1606 Update Rollup 1 Fixes

Consult this support page for a full list of issues fixed.

Before you begin

Downloading and installing this update is done entirely from the console. There’s no download link, the update will appear in your console once synchronized.

When you install an in-console update: (New Versions,CU,UR,KB)

  • It automatically runs a prerequisite check. You can also run this check prior to starting the installation
  • It installs at the central administration site (if you have one), and at primary sites automatically. You can control when each primary site server is allowed to update its infrastructure by using Service Windows for site servers
  • After a site server updates, all affected site system roles (including instances of the SMS Provider) automatically update. Configuration Manager consoles also prompt the console user to update the console, after the site installs the update
  • If an update includes the Configuration Manager client, you are offered the option to test the update in pre-production, or to apply the update to all clients immediately
  • After a primary site is updated, secondary sites do not automatically update. Instead, you must initiate the secondary site update

In this post, we’ll be updating a standalone Primary Site Server, console and clients.

Reminder
It’s a best practice to have some exclusions for your antivirus/anti-malware software on the SCCM server. Here a list for exclusions from SCCM 2012, which is still valid for CB as far as we know.You could also consider disabling the AV prior to installing the update and re-enable it once completed.

Before installing, check if your site is ready for the update :

  • Open the SCCM console
  • Go to Administration \ Cloud Services \ Updates and Servicing
  • In the State column, ensure that the update is Available

sccm 1606 update rollup 1

  • If it’s not available, right-click Updates and Servicing and select Check for Updates

sccm 1606 update rollup 1

  • The update state will change to Downloading
  • You can follow the download in Dmpdownloader.log

sccm 1606 update rollup 1

  • The update files are stored in the EasyPayload folder in your SCCM Installation directory

sccm 1606 update rollup 1

SCCM 1606 Update Rollup 1 Installation Guide

Step 1 | SCCM 1606 Update Rollup 1 Prerequisite Check

Before launching the update, we recommend to launch the prerequisite check :

  • Open the SCCM console
  • Go to Administration \ Cloud Services \ Updates and Servicing
  • Right-click the Configuration Manager 1606 Hotfix (KB3186654) update and select Run prerequisite check

sccm 1606 update rollup 1

  • Nothing will happen, the prerequisite check runs in the background. All menu options will be grayed out during the check

sccm 1606 update rollup 1

  • You can  monitor prerequisite check by going to Monitoring / Site Servicing Status, right-click your Update Name and select Show Status

sccm 1606 update rollup 1

  • When completed the State column will show Prerequisite check passed

sccm 1606 update rollup 1

Step 2 | Launching the SCCM 1606 Update Rollup 1

We are now ready to launch the SCCM 1606 Update rollup 1. At this point, plan about 30 minutes for the update installation.

  • Right click the Configuration Manager 1606 update and select Install Update Pack

sccm 1606 update rollup 1

  • On the General tab, click Next

sccm 1606 update rollup 1

  • In the Client Update Options, select the desired option for your client update
    • This new feature allows to update only clients member of a specific collection. Refer to the Technet article for more details

sccm 1606 update rollup 1

  • On the License Terms tab, accept the licence terms and click Next

sccm 1606 update rollup 1

  • On the Summary tab, review your choices and click Next

sccm 1606 update rollup 1

  • On the Completion tab, close the wizard. The whole process took a minute but the installation is not over, it has been initiated

sccm 1606 update rollup 1

  • During installation, the State column changes to Installing
  • You can  monitor installation by going to Monitoring / Site Servicing Status, right-click your Update Name and select Show Status

sccm 1606 update rollup 1

  • … or you can follow detailed installation progress in SCCM Installation Directory\Logs\CMUpdate.log

sccm 1606 update rollup 1

Warning
We’ve done numerous SCCM 1606 installation/upgrade. Some installation start a couple of minutes after you complete the wizard but we’ve seen some installation starts after a 10 minutes delay. Do not reboot or restart any services during this period or your update could be stuck in “Prerequisite check passed” status and all other options greyed out. There’s actually no officially documented methods by Microsoft to fix that. Patience is the key !
  • When completed, you’ll notice the message There are no pending update package to be processed in the log file
  • Monitoring / Site Servicing Status, right-click your Update Name and select Show Status, the last step will be Installation Succeeded

sccm 1606 update rollup 1

  • Refresh the Updates and Servicing node, the State column will be Installed

sccm 1606 update rollup 1

Updating the consoles

Since 1602, the console has an auto-update feature. At console opening, if you are not running the latest version, you will receive a warning and the update will start automatically.

  • Since all updates operations were initiated from the console, we didn’t close it during the process. We received a warning message when clicking certain objects. You will have the same message when opening a new console

sccm 1606 update rollup 1

  • Click OK,  console update will starts automatically

sccm 1606 update rollup 1

sccm 1606 update rollup 1

  • Wait for the process to complete. You can follow the progress in C:\ConfigMgrAdminUISetup.log and C:\ConfigMgrAdminUISetupVerbose.log. Once completed, the console will open and you’ll be running the latest version

Verification

Consoles

After setup is completed, verify the build number of the console. If the console upgrade was successful, the build number will be 5.0.8412.1307. Note that the Site Version is not changed to the Update rollup version. This is normal.

sccm 1606 update rollup 1

Clients

The client version will be updated to 5.00.8412.1307 (after updating, see section below)

sccm 1606 update rollup 1

SCCM 1606 Update rollup 1 Client Package distribution

You’ll see that the 2 client packages are updated :

  • Navigate to Software Library \ Application Management \ Packages

sccm 1606 update rollup 1

  • Check if both package were updated, if not, select both package and initiate a Distribute Content to your distribution points

Updating the Clients

Our preferred way to update our clients is by using the Client Upgrade feature :

  • Open the SCCM Console
  • Go to Administration / Site Configuration / Sites
  • Click the Hierarchy Settings in the top ribbon
  • Select Client Upgrade tab
  • The Upgrade client automatically when the new client update are available checkbox has been enabled
  • Review your time frame and adjust it to your needs

sccm 1606 update rollup 1

Monitor SCCM Client Version Number

You can see our SCCM Client version reports to give detailed information about every clients versions in your environment. It’s the easiest way to track your client updates.

SCCM 2012 - System Health Configuration Manager SS

Collections

You can also create a collection that targets clients without the latest client version. I use it to monitor which client haven’t been updated yet.

Here’s the query to achieve this: (You can also refer to our Set of Operational Collection Powershell Script which contains this collection)

select SMS_R_SYSTEM.ResourceID,SMS_R_SYSTEM.ResourceType,SMS_R_SYSTEM.Name,SMS_R_SYSTEM.SMSUniqueIdentifier,SMS_R_SYSTEM.ResourceDomainORWorkgroup,SMS_R_SYSTEM.Client from SMS_R_System where SMS_R_System.ClientVersion != '5.00.8412.1307'

Happy SCCM 🙂

Manage Windows 10 Upgrades using SCCM (Windows as a Service)

Windows as a service provides a new way to think about building, deploying, and servicing the Windows operating system. Microsoft will releases new builds two to three times per year rather than the traditional upgrade cycle. Instead of doing traditional Windows deployment projects, you will need a continuous updating process which will reduce the overall effort required to maintain Windows 10 devices in your environment.

SCCM Windows 10 Upgrades Summary

This post will look at the available tools in SCCM to manage and deploy Windows 10 upgrades. We have broken down the post in 4 different sections :

  • Windows 10 Servicing Dashboard
  • What’s missing in the Windows 10 Servicing Dashboard
  • Windows 10 reports
  • Windows 10 Collections

SCCM Windows 10 Servicing Dashboard

The Windows 10 servicing dashboard provides information about Windows 10 computers in your environment, active servicing plans, compliance information, and so on. Let’s get a look at the different dashboard tiles:

SCCM Windows 10 upgrades

  • Windows 10 Usage tile (1): Provides a breakdown of Windows 10 builds. Windows Insiders builds are listed as other as well as any builds that are not yet known. The Service Connection Point is responsible of this data.
  • Windows 10 Rings tile (2): Provides a breakdown of Windows 10 by branch and readiness state . The LTSB segment will be all LTSB versions (For example : Windows 10 LTSB 2015). The Release Ready segment corresponds to Current Branch (CB), and the Business ready segment is Current Branch for Business (CBB)
  • Create Service Plan tile (3): Provides a quick way to create a servicing plan
  • Expired tile (4): Displays the percentage of devices that are on a build of Windows 10 that is past its end of life. The computers in this category should be upgraded to the next build version. We’ll talk about the available options later in this post. (Task Sequence and Services Plans)
  • Expire Soon tile (5): Displays the percentage of computers that are on a build that is near end of life (within about four months), similar to the Expired tile
  • Alerts tile (6): Displays active alerts
  • Service Plan Monitoring tile (7): Display servicing plans that you have created and a chart of the compliance for each. This gives you a quick overview of the current state of the servicing plan deployments. If an earlier deployment ring meets your expectations for compliance, then you can select a later servicing plan (deploying ring) and click Deploy Now instead of waiting for the servicing plan rules to be triggered automatically
  • The Windows 10 Builds tile (8): Display is a fixed image time line that provides you an overview of the Windows 10 builds that are currently released and gives you a general idea of when builds will transition into different states.

What’s missing in the Windows 10 Servicing Dashboard

The Windows 10 Servicing Dashboard is a good starting point but it lacks important functions to be able to do your work to update Windows 10 as tiles are not clickable :

  • What if I need to have the list of Windows 10 devices per rings or versions ?
  • What if I need to have the list of Windows 10 that are Expired or Expiration Soon
  • In our example 33% of my devices are in the Expiration Soon state. Great, but how many devices is that ? A simple tooltip showing the number would have been a nice idea.

For those reasons, we decided to make your life easier by developing tools to help with your Windows 10 upgrades deployments.

Windows 10 Reports

Unfortunately, there’s no built-in report to track your Windows 10 devices. Some report in the Upgrade Assessment may help you but some of those reports are limited to Windows 7 and Windows 8. We decided to create our own Windows 10 report. Similar to the Windows 10 dashboard visually but which can easily list machines in different support state and their inventory.

See our Asset – Windows 10 report page to see the complete feature list.

SCCM Windows 10 upgrades

Windows 10 Collections

As for any other deployments, you will need to create your own device collections in order to deploy your Windows 10 service plans or task sequences. Our Set of operational collections contains 67 collections which contains 9 Windows 10 collections to begin with :

SCCM Windows 10 upgrades

Service Plan Vs Task Sequences

Once you’ve targeted your Windows 10 devices to upgrade, it’s a matter of deploying a service plan or a task sequence to those machine to keep them in the right support state. To decide which methods suits your organisation needs, read our complete step-by-step post which guide you thought the whole process :

Using a combination of the tools provided in this post, you should be set to start your Windows 10 as a service management. Feel free to provides tips and other tools that make your life easier using the comment section.